When the holiday season rolls around, the craving for something festive and delightful becomes undeniable. Enter Red & Green Crinkle Cookies—the perfect treat for those winter evenings spent surrounded by family! With their vibrant colors and chewy, chocolatey flavor, these cookies stand out on any dessert table. One bite reveals a soft, fudgy interior that melts in your mouth, while the crackly exterior adds a satisfying crunch. What’s even more delightful is the simplicity of the recipe! Whether you’re a seasoned baker or a kitchen novice, these cookies are easy to whip up, making them perfect for all skill levels.
Did you know crinkle cookies trace their origins back to childhood baking experiences? It’s like those beloved chocolate chip cookies everyone loves, but with a fun, festive twist! In fact, they remind me of my popular blog post on classic chocolate crinkle cookies. So why not surprise your family with these vibrant treats this season? They’ll surely be impressed and perhaps have you claiming that the way to a man’s heart is indeed through his stomach!
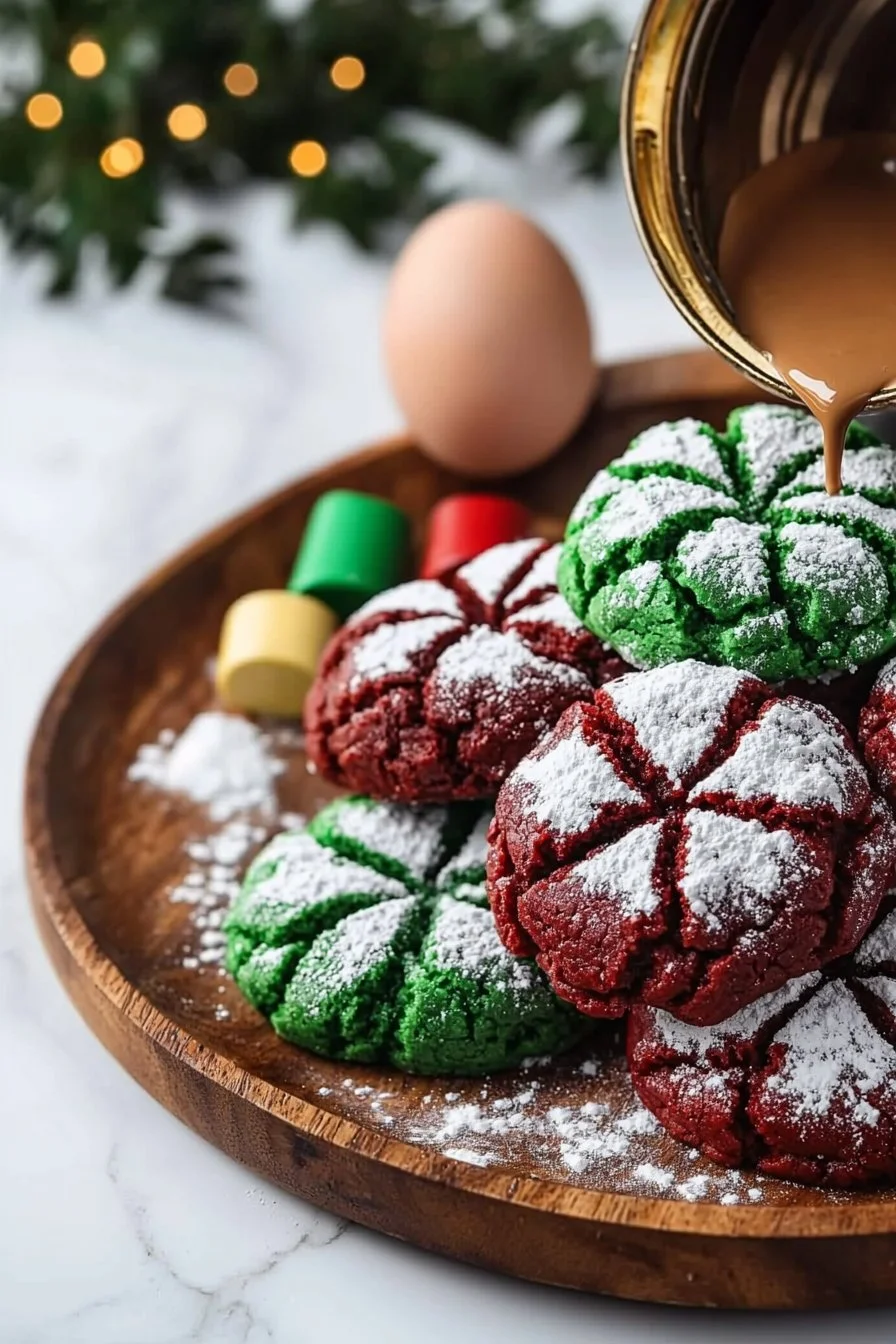
What is Red & Green Crinkle Cookies?
Wondering where the name Red & Green Crinkle Cookies comes from? It’s as simple as it sounds—these delightful cookies are adorned in vibrant red and green hues, reminiscent of holiday cheer! But are they really that different from regular cookies? Picture this: you’re at a gathering with friends and family, and instead of the usual chocolate chip cookies, you’re greeted by these festive treats that shine like little jewels on the platter. Kids will love the colors, and adults will appreciate the rich chocolate flavor. It’s a cookie that brings joy and warmth to any winter evening! So roll up your sleeves, grab your mixing bowls, and let’s create something magical.
Why You’ll Love This Red & Green Crinkle Cookies
There’s no denying it—the star of any holiday gathering is often a beautifully presented cookie dish. That’s where Red & Green Crinkle Cookies shine, acting as both a delightful treat and a conversation starter. Apart from being visually stunning, they’re also a cost-effective way to satisfy a sweet tooth without breaking the bank. Cooking at home means you can enjoy the same flavors as expensive store-bought cookies but with the added love and experience of making them yourself.
Imagine indulging in that rich cocoa flavor, each bite bursting with flavor that dances on your palate. The addition of powdered sugar on top not only enhances the presentation but also gives a delightful sweetness with each bite. If you’re a fan of traditional brownies, you’ll find the crinkle cookies to be a delightful spin on that beloved dessert. Why not gather your loved ones and create a baking session that fills your home with laughter and sweet aromas?
How to Make Red & Green Crinkle Cookies
Quick Overview
Making Red & Green Crinkle Cookies is a breeze! This recipe yields delicious, visually appealing cookies that are sure to impress. In just about 30 minutes of hands-on time and 10-12 minutes of baking, you can have these scrumptious bites ready to serve. The combination of fudgy chocolate with a light crunch is simply irresistible.
Ingredients
- 1 cup all-purpose flour
- 1/2 cup cocoa powder
- 1 cup sugar
- 1/2 cup unsalted butter, softened
- 2 large eggs
- 1 teaspoon vanilla extract
- 1 teaspoon baking powder
- 1/4 teaspoon salt
- Powdered sugar for dusting
- Red and green food coloring
Please ensure all ingredients are halal-compliant.
Step-by-Step Instructions
- Preheat the Oven: Begin by preheating your oven to 350°F (175°C). This ensures your cookies will bake evenly.
- Mix the Dry Ingredients: In a medium mixing bowl, combine the flour, cocoa powder, baking powder, and salt. Whisk them together until well combined.
- Cream Butter and Sugar: In a large mixing bowl, beat the softened butter and sugar together until the mixture is light and fluffy—this usually takes about 2-3 minutes.
- Add Eggs and Vanilla: Incorporate the eggs, one at a time, mixing well after each addition. Stir in the vanilla extract until combined.
- Combine Mixtures: Gradually add the dry ingredients to the wet mixture, stirring until just combined. Do not over-mix!
- Divide and Color the Dough: Divide the dough into two equal portions. Add red food coloring to one half and green to the other, kneading gently to incorporate the colors.
- Chill the Dough: Cover and refrigerate both portions of dough for about 30 minutes. This firming step is crucial for a better texture and ease of rolling.
- Form the Cookies: Once chilled, take a tablespoon of each colored dough and roll them into balls, then roll them in powdered sugar to coat.
- Bake: Place the cookies on a baking sheet lined with parchment paper, leaving sufficient space between each one. Bake for 10-12 minutes or until the tops are cracked.
- Cool and Enjoy: Let the cookies cool on the baking sheet for a few minutes before transferring them to a wire rack to cool completely.
Top Tips for Perfecting Red & Green Crinkle Cookies
- Substitutions: If you need to make it dairy-free, you can use plant-based butter instead.
- Timing: Keep an eye on your cookies as they bake. Oven temperatures can vary, so your perfect baking time may be slightly different.
- Avoid Overmixing: When combined, try to keep the mixing to a minimum to maintain that soft, chewy texture.
Storing and Reheating Tips
To keep your Red & Green Crinkle Cookies fresh, store them in an airtight container at room temperature. They can last up to a week, but trust me, they’ll likely be gone much sooner! If you want to enjoy them later, consider freezing the cookies. Layer cookies between parchment paper inside an airtight container and freeze. They will stay fresh for up to three months. For reheating, simply pop them in the microwave for 10-15 seconds to retain that soft, fudgy texture. Enjoy baking and sharing these delightful cookies with family and friends!

Red & Green Crinkle Cookies
Ingredients
Method
- Preheat the oven to 350°F (175°C).
- In a medium mixing bowl, combine flour, cocoa powder, baking powder, and salt. Whisk until well combined.
- In a large mixing bowl, beat the softened butter and sugar until light and fluffy, about 2-3 minutes.
- Incorporate eggs one at a time, mixing well after each addition. Stir in the vanilla extract.
- Gradually add the dry ingredients to the wet mixture, stirring until just combined. Do not over-mix!
- Divide the dough into two equal portions. Add red food coloring to one half and green to the other, kneading gently.
- Cover and refrigerate both portions of dough for about 30 minutes.
- Roll each colored dough into balls, then roll them in powdered sugar to coat.
- Place the cookies on a baking sheet lined with parchment paper, leaving space between each.
- Bake for 10-12 minutes or until the tops are cracked.
- Let the cookies cool on the baking sheet for a few minutes before transferring to a wire rack to cool completely.
Notes

I am Mark Luke and I’m the founder of PrinterBio.com. I started this site because I was tired of dealing with the problems that come with using printers. I wanted to help others avoid the time and frustration I had, So I started this site based on my own experience & what I’ve learned from other professionals. My goal is to help you find the right printer and easily solve any problems you may have with your printer.