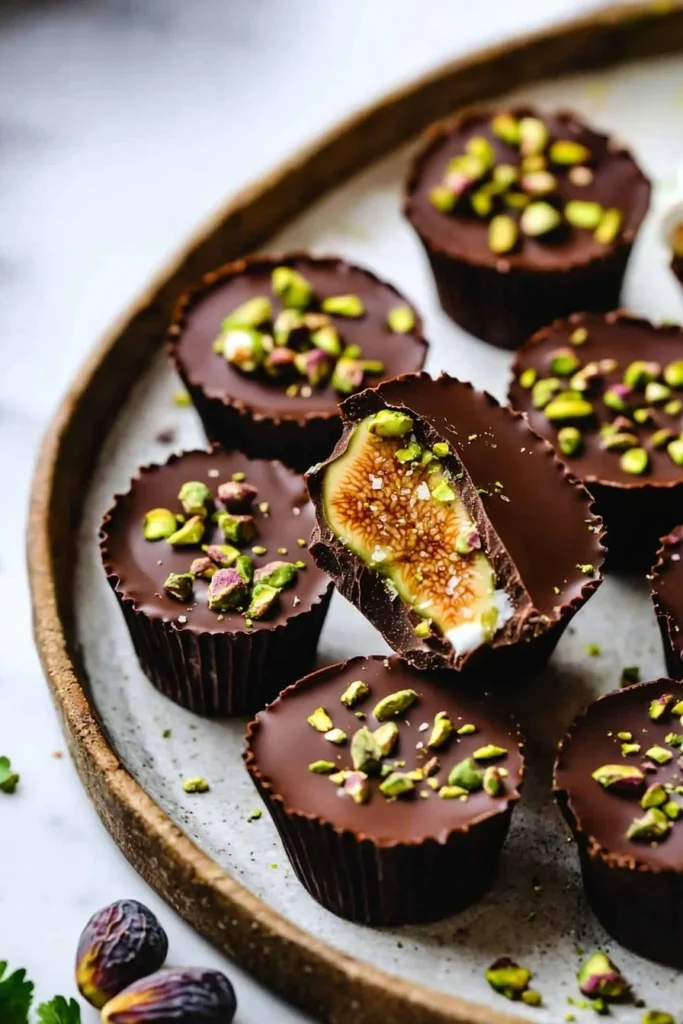
If you’re on the hunt for a decadent dessert that melds rich chocolate with a satisfyingly crunchy texture, look no further than Dubai Chocolate Cups. Imagine biting into a velvety chocolate shell, only to discover a luscious filling of coconut cream paired with delightful bits of dried fruits and nuts. If that instant image makes your mouth water, you’re not alone! In fact, whenever I whip up these sweets, they disappear faster than you can say “I need more chocolate!”
Dubai chocolate cups bring a touch of Middle Eastern allure to the table, perfect for family gatherings on cozy winter evenings. They’re strikingly easy to make, which is always a win—believe me, you won’t be stuck in the kitchen for hours. Unlike those intricate pastries you might find in upscale cafes, these cups are straightforward and a great treat to serve alongside my famous Pistachio Baklava. Both desserts resonate with rich flavors with a gentle nod to the Middle Eastern palate, making them an ideal duo for your next gathering!
What are Dubai Chocolate Cups?
Ah, the Dubai Chocolate Cups—isn’t the name just alluring? One could wonder if they were invented on a sunny beach in Dubai or under the twinkling lights of the Burj Khalifa! While we may not have a captivating tale of their origins, what’s certain is that they’ve earned their place as a favorite among chocolate lovers. What’s a better way to win a heart than with dessert? After all, as the saying goes, “the way to a man’s heart is through his stomach!” Why not impress someone special with these delightful bites? Trust me, they won’t even notice that they’re not a pastry chef! Now, let’s get cracking—your sweet adventure awaits!
Why You’ll Love These Dubai Chocolate Cups
These Dubai Chocolate Cups shine as a showstopper for any occasion. What makes them noteworthy? First off, each bite is an indulgent experience, from the rich dark chocolate shell to the creamy coconut filling topped with crunchy pistachios and sweet dates. Secondly, preparing this dessert at home is remarkably cost-effective compared to expensive dessert shops—you’ll save coins while delighting your family! Plus, they’re incredibly versatile—try experimenting with toppings like crushed almonds or coconut flakes for extra flair.
If you enjoy the classic chocolate truffles, you’re in for a treat with this recipe! Both desserts feature chocolate but offer different textures and flavors, allowing you to explore a whole new world of sweetness. So why wait? Grab your ingredients and let’s dive into the joy of chocolate making!
How to Make Dubai Chocolate Cups
Quick Overview
The beauty of Dubai Chocolate Cups is how easy they are to make, yet they taste like a million bucks. You’ll experience the crunch of the chocolate shell perfectly contrasted with a creamy filling that will have everyone craving more. In just about 30 minutes, plus some chilling time, you’ll have a tray of chocolate cups ready to impress!
Ingredients for Dubai Chocolate Cups
- 200g dark chocolate
- 100g milk chocolate
- 1/2 cup coconut cream
- 1/4 cup chopped dates
- 1/4 cup crushed pistachios
- 1/4 cup dried figs
Preparation Notes: Make sure to use quality dark and milk chocolates for the best flavor. The coconut cream adds an irresistible creaminess, and feel free to substitute the dried fruits with your personal favorites if desired!
Step-by-Step Instructions
- Prepare the Chocolate Shells: Begin by melting the dark chocolate and milk chocolate together in a microwave or double boiler until smooth. Stir continuously to prevent burning.
- Mold the Cups: Using a spoon or a brush, coat the inside of silicone muffin molds with the melted chocolate, ensuring an even layer. Let it set in the fridge for about 15 minutes, or until firm.
- Make the Filling: In a mixing bowl, combine the coconut cream, chopped dates, crushed pistachios, and dried figs. Mix well until everything is evenly distributed.
- Assemble the Cups: Once the chocolate shells are firm, spoon the filling into each cup, leaving enough space at the top to seal with more chocolate.
- Seal the Cups: Melt the remaining chocolate and carefully pour a layer on top of each filled cup, making sure to cover the filling completely. Return the molds to the fridge for another 10-15 minutes.
- Unmold and Serve: Once fully set, gently pop the chocolate cups out of the molds. Serve them on a beautiful platter and watch your guests indulge!
Top Tips for Perfecting Dubai Chocolate Cups
- Ingredient Substitutions: If you’re looking for Halal-friendly options, only use chocolates and fillings that don’t contain any non-Halal ingredients. For instance, opt for dairy-free chocolate if you want to make it vegan-friendly!
- Timing Matters: Make sure not to rush the setting process in the fridge; a chilly environment allows the chocolate to harden properly.
- Avoiding Mistakes: Ensure your chocolate isn’t too hot when pouring into the molds, as overheating can spoil the texture. Make sure to stir it well to remove any lumps.
Storing and Reheating Tips
These Dubai Chocolate Cups are best enjoyed within a week. They can be stored in an airtight container in the refrigerator for up to 5 days. For longer storage, consider freezing them for up to a month—just make sure to wrap them well to prevent freezer burn. Forgot to take them out in advance? No worries! Just let them sit at room temperature for a bit before serving. You’ll want to enjoy them at their best, a little soft but perfectly delicious.
Now that you’ve got the recipe and tips in hand, it’s time to indulge your family and friends with these irresistible Dubai Chocolate Cups. Happy cooking and enjoy every delightful bite!

Dubai Chocolate Cups
Ingredients
Method
- Begin by melting the dark chocolate and milk chocolate together in a microwave or double boiler until smooth.
- Using a spoon or brush, coat the inside of silicone muffin molds with the melted chocolate, ensuring an even layer.
- Let the chocolate shells set in the fridge for about 15 minutes, or until firm.
- In a mixing bowl, combine the coconut cream, chopped dates, crushed pistachios, and dried figs. Mix well until everything is evenly distributed.
- Once the chocolate shells are firm, spoon the filling into each cup, leaving enough space at the top to seal with more chocolate.
- Melt the remaining chocolate and carefully pour a layer on top of each filled cup, ensuring the filling is completely covered.
- Return the molds to the fridge for another 10-15 minutes.
- Once fully set, gently pop the chocolate cups out of the molds and serve on a beautiful platter.
Notes

I am Mark Luke and I’m the founder of PrinterBio.com. I started this site because I was tired of dealing with the problems that come with using printers. I wanted to help others avoid the time and frustration I had, So I started this site based on my own experience & what I’ve learned from other professionals. My goal is to help you find the right printer and easily solve any problems you may have with your printer.