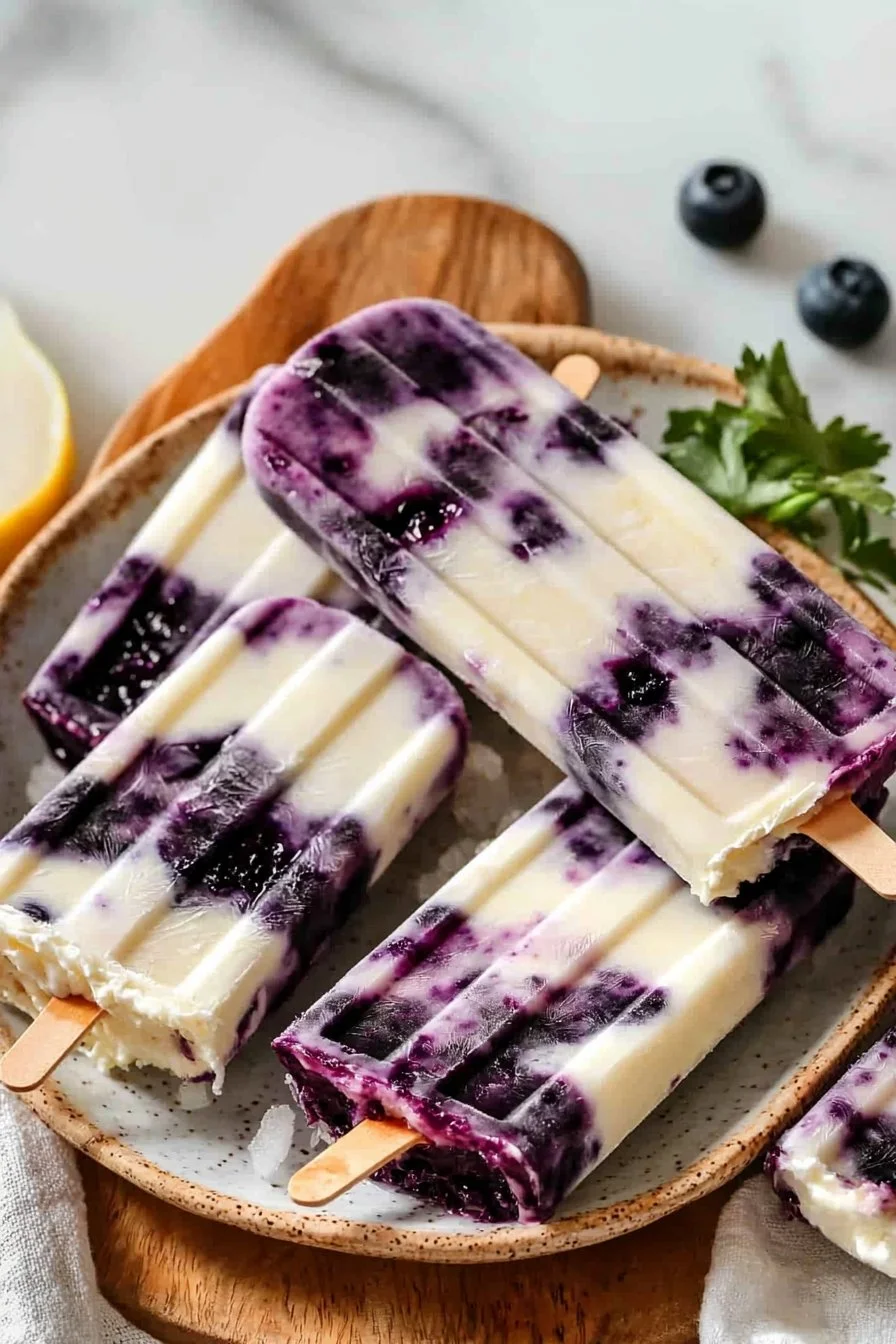
Nothing says summer like a delightful frozen treat that combines the luscious flavors of blueberries and the creamy goodness of cheesecake. Enter the Blueberry Cheesecake Popsicles—a refreshing dessert that’s not only easy to make but also wonderfully satisfying. Imagine biting into a smooth popsicle bursting with sweet blueberry goodness, all while enjoying an afternoon with family or friends. Fun fact: did you know that blueberries are considered a superfood? They’re packed with antioxidants and vitamins, making them a deliciously healthy choice.
What sets these popsicles apart is their seamless blend of cream cheese and Greek yogurt, resulting in a texture that’s both creamy and cool. Unlike traditional desserts that can be a hassle to whip up, these popsicles offer the indulgent taste of cheesecake without the oven time. If you have ever tried my popular “Mango Sorbet” recipe, you’ll appreciate the simplicity and joy that these Blueberry Cheesecake Popsicles bring to your kitchen. They’re not just a snack; they’re a wonderful way to cool down and gather your loved ones for a warm evening treat!
What is Blueberry Cheesecake Popsicles?
So, what exactly is this heavenly creation called Blueberry Cheesecake Popsicles? Well, it’s a delightful fusion of sweet, tangy blueberries with the rich, creamy texture of cheesecake, all frozen into a convenient popsicle. But seriously, how did we arrive at such a catchy name? Perhaps it was created by someone who really loved both blueberries and cheesecake—or maybe a very wise person once said, “the way to a man’s heart is through his stomach!” Either way, it sounds enticing, right?
Imagine this: a hot summer day, and you’re lounging in the sun, dreaming of something cold and luscious on a stick. That’s the kind of joy these popsicles deliver! Get ready to impress your family and friends with this stunning and irresistible dessert. Are you convinced yet? Dive into this fun and tasty adventure of making your very own Blueberry Cheesecake Popsicles!
Why You’ll Love This Blueberry Cheesecake Popsicles
Let’s break down the magic of these Blueberry Cheesecake Popsicles! First, they are the star of any family gathering. The creamy texture and the flavor explosion of fresh blueberries will have everyone reaching for seconds, if not thirds! Plus, the thrill of creating such a delightful treat at home means you can skip overpriced ice cream shops while savoring splendid homemade goodness. Who wouldn’t want to create something so delectable right in their own kitchen?
When it comes to toppings, the possibilities are endless. Whether you sprinkle some crushed nuts on top or drizzle honey for added sweetness, these popsicles can be customized to suit everyone’s tastes. If you’ve ever had to choose between a traditional cheesecake and a refreshing smoothie, these popsicles are the best of both worlds. Now, why not grab the ingredients and give these a whirl?
How to Make Blueberry Cheesecake Popsicles
Quick Overview
Making Blueberry Cheesecake Popsicles is incredibly easy and fulfilling. In just 15 minutes, you can whip up a batch ready to freeze. With a smooth and rich texture complemented by the flavorful zest of blueberries, this treat is bound to become a family favorite. Let’s see what we’ll need to create this masterpiece!
Ingredients
To prepare Blueberry Cheesecake Popsicles, gather the following ingredients:
- 1 cup blueberries (fresh or frozen)
- 1 cup cream cheese, softened
- 1/2 cup sugar
- 1 cup Greek yogurt
- 1 teaspoon vanilla extract
- 1 tablespoon lemon juice
- Popsicle molds
Step-by-Step Instructions
- Prepare Your Ingredients: Start by washing your blueberries and letting them dry. If you’re using frozen blueberries, there’s no need to thaw them—just toss them in!
- Blend the Mixture: In a blender or food processor, combine the cream cheese, sugar, Greek yogurt, vanilla extract, and lemon juice. Blend until the mixture is smooth and creamy. You’ll want to scrape down the sides to ensure everything is mixed thoroughly.
- Add the Blueberries: Next, gently fold in the blueberries. If you like chunks of fruit in your popsicles, you can leave them whole. If you prefer a smoother texture, you can blend them directly into the mixture.
- Pour into Molds: Pour the creamy blueberry mixture into your popsicle molds. Leave a little space at the top to allow for expansion during freezing.
- Insert Sticks: If your molds have sticks, insert them according to the manufacturer’s instructions. If not, you can place a piece of foil over the top, and insert the sticks through the foil.
- Freeze: Place the molds in the freezer for at least 4-6 hours, or until fully frozen. Overnight is the best if you want them to be solid for a summer party!
Top Tips for Perfecting Blueberry Cheesecake Popsicles
- Substitutions: If you want to try different flavor combinations, feel free to swap out blueberries for another favorite berry like strawberries or raspberries. Just make sure they are Halal!
- Optimal Freezing: Ensure your popsicles freeze for at least 4 hours to achieve the best texture.
- Avoiding Common Mistakes: Be cautious while blending—mix just enough to keep some blueberry pieces intact for texture.
Storing and Reheating Tips
Once you’ve made your Blueberry Cheesecake Popsicles, storing them properly is crucial to maintain freshness. Keep them in the freezer for up to 2 months. To enjoy, simply remove them from the molds and let them sit at room temperature for a minute or two for easier removal. Not only do these popsicles freeze well, but they also hold their flavor and texture wonderfully over time.
If you have leftover popsicles, place them in zip-top freezer bags, labeling them for easy identification later on. This way, you’ll be set for those warm nights when you crave something sweet and cool!
Now that you are armed with all the knowledge needed to create the best Blueberry Cheesecake Popsicles ever, it’s time to gather your ingredients and get mixing. Enjoy your creamy, fruity, refreshing dessert, and happy freezing!
FAQ
- Can I make these with low-fat cream cheese?
Yes, substitute with low-fat cream cheese if you want a lighter version while maintaining that creamy goodness! - Can I add other flavors?
Absolutely! Mixing in vanilla or almond extract can enhance the overall flavor. - What if I can’t find popsicle molds?
You can use small cups or any freezer-safe containers. Just cover them with foil and insert sticks as suggested earlier.
Now, get out there and make some delicious Blueberry Cheesecake Popsicles—you won’t regret it!

Blueberry Cheesecake Popsicles
Ingredients
Method
- Wash your blueberries and let them dry. If using frozen blueberries, there's no need to thaw them—just toss them in.
- In a blender or food processor, combine cream cheese, sugar, Greek yogurt, vanilla extract, and lemon juice. Blend until smooth and creamy, scraping down the sides as needed.
- Gently fold in the blueberries. For chunks of fruit, leave them whole. For a smoother texture, blend them in.
- Pour the mixture into popsicle molds. Leave some space at the top for expansion when freezing.
- Insert sticks according to manufacturer’s instructions or cover with foil and insert sticks through the foil.
- Freeze for at least 4-6 hours or overnight until fully frozen.
Notes

I am Mark Luke and I’m the founder of PrinterBio.com. I started this site because I was tired of dealing with the problems that come with using printers. I wanted to help others avoid the time and frustration I had, So I started this site based on my own experience & what I’ve learned from other professionals. My goal is to help you find the right printer and easily solve any problems you may have with your printer.