Nothing brings a smile to your face quite like the rich, creamy flavor of chocolate mingling with the nutty goodness of peanut butter. Imagine biting into a soft, chewy bar that is both satisfying and indulgent without the hassle of baking. That’s the magic of No-Bake Chocolate Peanut Butter Bars! Whether it’s a cozy family gathering or a chilly winter evening, these bars quickly become everyone’s favorite sweet treat.
Did you know that no-bake desserts were a common phenomenon during the Great Depression, when resources were scarce? These bars exemplify that same resourcefulness while delivering amazing taste. Just like my popular Peanut Butter Energy Balls, this recipe shares the simplicity of preparation but offers a uniquely rich flavor that is hard to resist. Pack these bars as snacks for family outings or serve them after a hearty meal for an extra touch of sweetness. Let’s dive into how to make these delightful morsels!
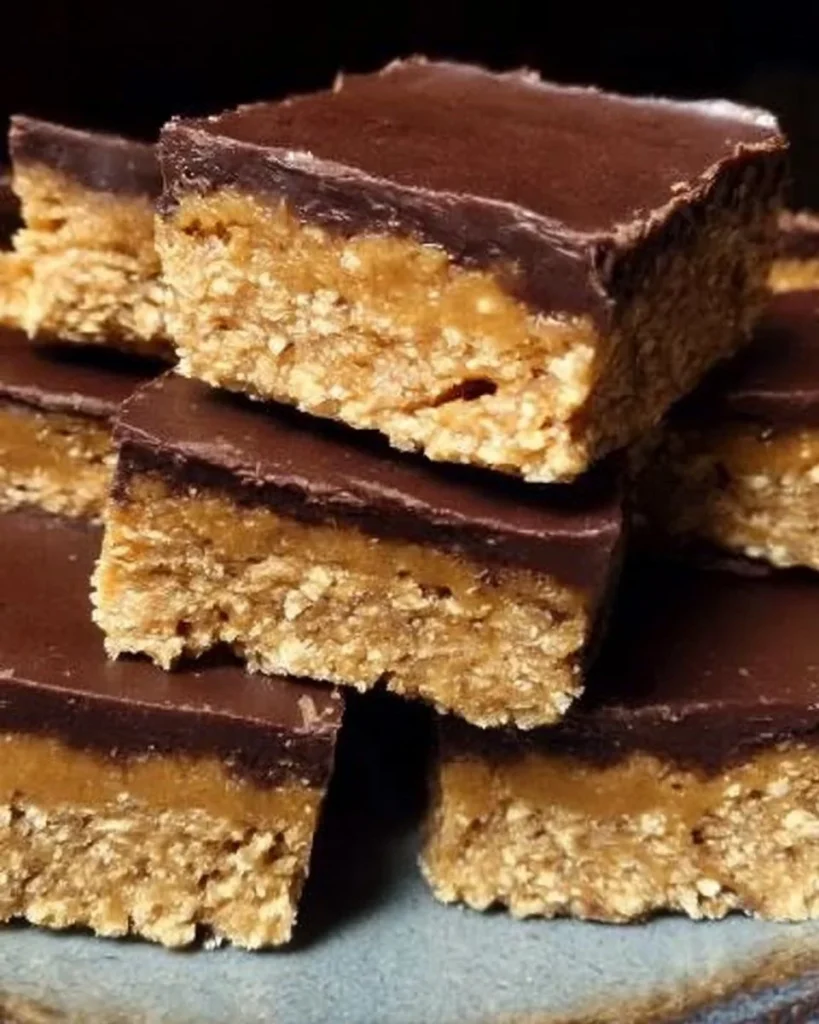
What is No-Bake Chocolate Peanut Butter Bars?
So, what’s up with the name “No-Bake Chocolate Peanut Butter Bars”? A bit of a tongue twister, isn’t it? But honestly, who would want to bake when you can create something so fabulous without turning on the oven? These bars combine peanut butter, honey, oats, and chocolate, making them incredibly satisfying. Some say the way to a man’s heart is through his stomach, and with these bars, you’ll definitely win over everyone at the table! Why not whip up a batch tonight and see how fast they disappear?
Why You’ll Love This No-Bake Chocolate Peanut Butter Bars
Let’s talk about the triumph of No-Bake Chocolate Peanut Butter Bars. First off, they’re the perfect sweet snack that serves as a delightful pick-me-up throughout the day. Secondly, making these bars at home saves money compared to packaged snacks! Plus, by preparing these yourself, you can control the ingredients and make them even healthier.
Imagine enjoying the creamy texture of smooth peanut butter and the delightful crunch of oats. You could even play around with toppings such as crushed nuts or dried fruits, giving these bars an extra layer of texture and flavor. They may remind you of classic chocolate-chip cookies, but trust me, the addition of that luscious peanut butter elevates every bite! Ready to impress your family or treat yourself? Let’s get started on this delightful recipe.
How to Make No-Bake Chocolate Peanut Butter Bars
Quick Overview
Whipping up a batch of No-Bake Chocolate Peanut Butter Bars is not just satisfying but also incredibly easy! With a preparation time of only 15 minutes, you can quickly have a delicious dessert ready to chill in the fridge. Each bite boasts a delightful blend of creamy chocolate and nutty peanut butter with a hint of sweetness, making them a treat for your taste buds.
Ingredients
Here’s what you’ll need to create these amazing bars:
- 1 cup peanut butter – The star of the show!
- 1/2 cup honey or maple syrup – For natural sweetness.
- 2 cups rolled oats – The hearty base.
- 1/2 cup chocolate chips – For that melty chocolate goodness.
- 1/4 cup cocoa powder – Extra chocolate richness.
- 1/2 teaspoon vanilla extract – A hint of warmth.
- Pinch of salt – Just a touch to elevate flavors.
Make sure all your ingredients are Halal-compliant, and you’re ready to go!
Step-by-Step Instructions
- Mix the Base: In a mixing bowl, combine the peanut butter and honey (or maple syrup) until smooth and blended.
- Add Dry Ingredients: Stir in the rolled oats, cocoa powder, salt, and vanilla extract. Mix until well combined; it should form a thick dough.
- Fold in Chocolate Chips: Gently fold the chocolate chips into the mixture so they are evenly distributed.
- Prepare the Pan: Line an 8×8 inch pan with parchment paper for easy removal.
- Press Down the Mixture: Transfer the mixture into the pan. Use a spatula to press the mixture down firmly into an even layer.
- Chill: Place the pan in the refrigerator for at least 1-2 hours until the bars are set.
- Cut and Serve: Once set, remove from the pan and cut into squares. Enjoy your delicious creation!
Top Tips for Perfecting No-Bake Chocolate Peanut Butter Bars
- Substitutions: Feel free to substitute almond butter for a nut-free option. You can use agave syrup if you prefer not to use honey.
- Timing: Make ahead! These bars are great for meal prep. They hold well in the fridge and can also be frozen for later enjoyment.
- Avoiding Mistakes: Make sure to press down the mixture firmly in the pan to avoid crumbling. The mixture needs to be dense enough to hold together once cut.
Storing and Reheating Tips
To keep your No-Bake Chocolate Peanut Butter Bars fresh, store them in an airtight container in the refrigerator for up to one week. You can also freeze them for longer storage—up to three months. When you’re ready to enjoy, thaw them in the fridge for a few hours before serving to maintain that perfect texture.
Now that you have this delightful recipe, grab those ingredients and get ready to treat your family! They’ll love these No-Bake Chocolate Peanut Butter Bars as much as you do. Happy cooking!

No-Bake Chocolate Peanut Butter Bars
Ingredients
Method
- In a mixing bowl, combine the peanut butter and honey (or maple syrup) until smooth and blended.
- Stir in the rolled oats, cocoa powder, salt, and vanilla extract. Mix until well combined; it should form a thick dough.
- Gently fold the chocolate chips into the mixture so they are evenly distributed.
- Line an 8x8 inch pan with parchment paper for easy removal.
- Transfer the mixture into the pan. Use a spatula to press the mixture down firmly into an even layer.
- Place the pan in the refrigerator for at least 1-2 hours until the bars are set.
- Once set, remove from the pan and cut into squares. Enjoy your delicious creation!
Notes

I am Mark Luke and I’m the founder of PrinterBio.com. I started this site because I was tired of dealing with the problems that come with using printers. I wanted to help others avoid the time and frustration I had, So I started this site based on my own experience & what I’ve learned from other professionals. My goal is to help you find the right printer and easily solve any problems you may have with your printer.