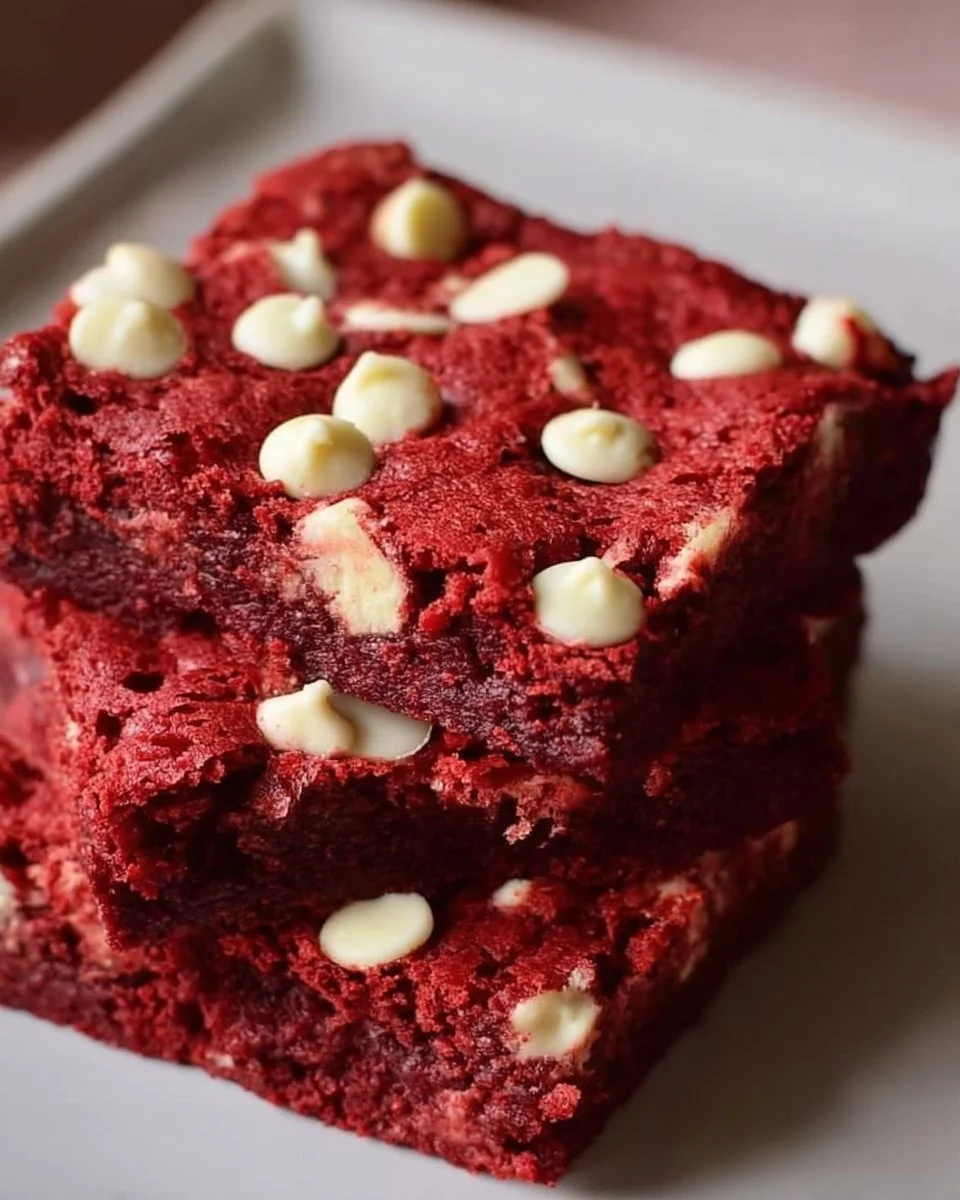
There’s something undeniably captivating about Classic Red Velvet Brownies With White Chocolate Chips. Imagine biting into a soft, fudgy brownie that’s decadently red and wonderfully sweet, with pockets of creamy white chocolate melting in your mouth. It’s a treat like no other that brings a sense of joy to family gatherings, and it’s surprisingly simple to whip up in your own kitchen!
Did you know that red velvet desserts were initially made with beets for a distinct color and flavor? Over time, they evolved into the beloved red velvet we enjoy today—perfect for any occasion. This recipe is not just another dessert; it’s a delightful experience that’s sure to impress. If you love our Classic Chewy Chocolate Chip Cookies, you’ll adore these brownies! They blend rich flavor with a velvety texture, making them a must-try recipe.
Ready to dive into the fun? Let’s bake!
What is Classic Red Velvet Brownies With White Chocolate Chips?
Curious about the name Classic Red Velvet Brownies With White Chocolate Chips? Who even came up with “red velvet”? Was there a velvet shortage that made cakes and treats irresistible with that signature color? As you ponder these questions, imagine how many hearts these brownies can win over! They say the way to a man’s heart is through his stomach, and believe me, these brownies are a foolproof way to win anyone over.
With their stunning crimson color and creamy white chocolate, they’re perfect for serving at family dinners or cozy winter evenings. The delightful flavors and textures take this treat to a whole new level that will have your friends and family coming back for more. Ready to bake? Let’s go!
Why You’ll Love This Classic Red Velvet Brownies With White Chocolate Chips
First off, what makes these Classic Red Velvet Brownies With White Chocolate Chips so irresistible? The combination of rich red velvet flavor and sweet, luscious white chocolate chips creates a delicious dessert that stands out at any gathering. Plus, baking them at home saves you money compared to store-bought treats, leaving you with more to spend on other essentials—or more baking goodies!
Imagine cutting into these beautifully colored brownies, the fork gliding through and releasing an intoxicating aroma that fills your kitchen in seconds. If you love a simple chocolate dessert, these brownies are an elegant twist that cater to both your taste buds and your wallet. Yum! Grab your apron and let’s make some magic!
How to Make Classic Red Velvet Brownies With White Chocolate Chips
Quick Overview
Making Classic Red Velvet Brownies With White Chocolate Chips is incredibly easy and oh-so-satisfying. With their chewy, fudgy texture complemented by a slight crispness on the edges, each bite is a delightful blend of flavors. The best part? You can have these yummy brownies ready in just about 30 minutes of prep time!
Ingredients
To create your own batch of Classic Red Velvet Brownies With White Chocolate Chips, gather the following ingredients:
- 1 cup all-purpose flour
- 1 cup granulated sugar
- 1/2 cup unsalted butter, melted
- 2 large eggs
- 1 tablespoon cocoa powder
- 1 teaspoon vanilla extract
- 1 teaspoon red food coloring
- 1/2 teaspoon baking powder
- 1/4 teaspoon salt
- 1 cup white chocolate chips
Each of these ingredients plays a vital role in achieving that signature flavor and texture, so make sure you have everything on hand before you start!
Step-by-Step Instructions
- Preheat Your Oven: Start by preheating your oven to 350°F (175°C) to ensure it’s hot and ready for your brownies.
- Prepare Your Baking Dish: Grease an 8-inch square baking dish or line it with parchment paper for easy removal.
- Mix the Wet Ingredients: In a large mixing bowl, whisk together the melted butter, granulated sugar, and eggs until smooth. Stir in the vanilla extract and red food coloring.
- Combine Dry Ingredients: In another bowl, sift together the all-purpose flour, cocoa powder, baking powder, and salt.
- Combine Mixtures: Gradually fold the dry mixture into the wet mixture until just combined. Be careful not to overmix!
- Add the Chocolate Chips: Gently fold in the white chocolate chips, reserving a few for sprinkling on top.
- Pour and Spread: Pour the batter into your prepared baking dish, spreading it evenly. Sprinkle the reserved white chocolate chips on top.
- Bake: Place the dish in the oven and bake for 20-25 minutes, or until a toothpick inserted in the center comes out with a few moist crumbs.
- Cool and Serve: Let the brownies cool in the pan for 10 minutes before transferring to a wire rack. Cut into squares and enjoy!
Top Tips for Perfecting Classic Red Velvet Brownies With White Chocolate Chips
- Substitutions: If you need a Halal-friendly version, consider using olive oil or coconut oil instead of butter for a richer flavor.
- Timing: Keep an eye on your brownies while they bake—remove them from the oven as soon as a toothpick comes out with moist crumbs but not wet batter.
- Avoiding Common Mistakes: Don’t overmix the batter as this can make your brownies dense. A few lumps are perfectly okay!
Storing and Reheating Tips
To keep your Classic Red Velvet Brownies With White Chocolate Chips fresh, store them in an airtight container at room temperature for up to 3 days. If you want to keep them longer, you can freeze them. Just wrap each brownie in plastic wrap and place them in a freezer-safe container. They’ll last for up to 3 months!
When you’re ready to enjoy, simply remove the brownies from the freezer and let them thaw at room temperature for about 30 minutes, or pop them in the microwave for a few seconds to warm them up. This will help restore their delightful fudgy texture!
Now that you’ve mastered the art of making Classic Red Velvet Brownies With White Chocolate Chips, it’s time to spread the joy! Don’t forget to share your masterpiece with family and friends—they’ll be in love with this delightful treat just like you are. Happy baking!

Classic Red Velvet Brownies With White Chocolate Chips
Ingredients
Method
- Preheat your oven to 350°F (175°C) to ensure it’s hot and ready for your brownies.
- Grease an 8-inch square baking dish or line it with parchment paper for easy removal.
- In a large mixing bowl, whisk together the melted butter, granulated sugar, and eggs until smooth. Stir in the vanilla extract and red food coloring.
- In another bowl, sift together the all-purpose flour, cocoa powder, baking powder, and salt.
- Gradually fold the dry mixture into the wet mixture until just combined. Be careful not to overmix!
- Gently fold in the white chocolate chips, reserving a few for sprinkling on top.
- Pour the batter into your prepared baking dish, spreading it evenly. Sprinkle the reserved white chocolate chips on top.
- Place the dish in the oven and bake for 20-25 minutes, or until a toothpick inserted in the center comes out with a few moist crumbs.
- Let the brownies cool in the pan for 10 minutes before transferring to a wire rack. Cut into squares and enjoy!
Notes

I am Mark Luke and I’m the founder of PrinterBio.com. I started this site because I was tired of dealing with the problems that come with using printers. I wanted to help others avoid the time and frustration I had, So I started this site based on my own experience & what I’ve learned from other professionals. My goal is to help you find the right printer and easily solve any problems you may have with your printer.