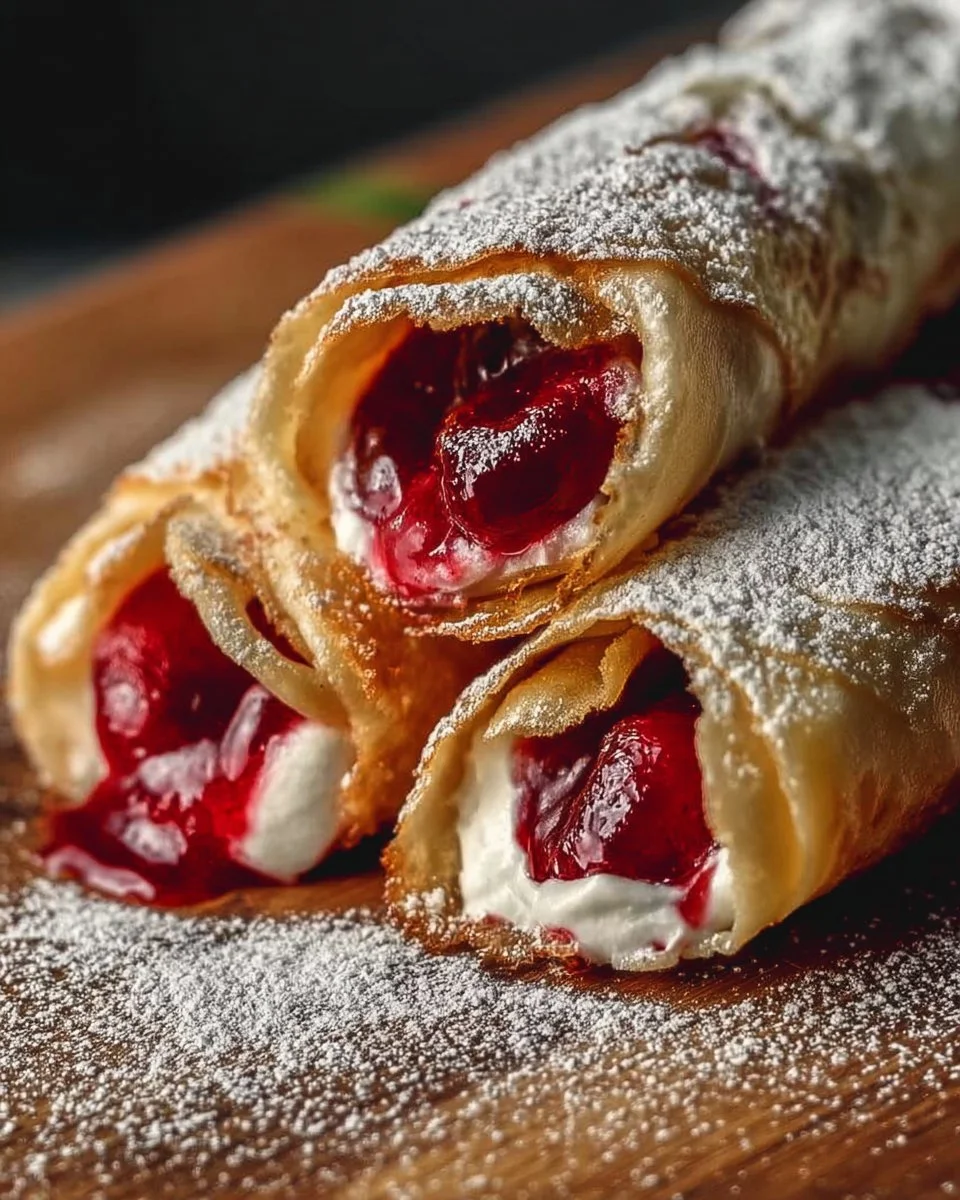
Are you ready for a treat that combines crispy, flaky pastry with the sweet, tart burst of cherry filling? Introducing Cherry Pie Filling Wraps, a delightful dessert that promises to be a hit at any family gathering or cozy winter evening! These wraps are not just about taste; they embody warmth and comfort, making them the perfect conversation starter.
Imagine the crunch of golden-brown pastry giving way to the luscious cherry filling, a texture that has your taste buds dancing in excitement. Fun fact: the first documented cherry pie recipe dates back to the 14th century! If you’re familiar with my popular chocolate-covered raspberry spring rolls, you’ll appreciate just how simple and satisfying these wraps are. Both desserts highlight the beauty of wrapping delicious fillings in pastry, creating an indulgent yet easy-to-make treat. So, let’s dive into this sensational recipe that’ll have your loved ones coming back for seconds (and thirds!).
What is Cherry Pie Filling Wraps?
So, what’s the deal with Cherry Pie Filling Wraps? Are they a pie? Are they a pastry? We could argue they’re a delightful hybrid of both! Picture this: one moment you have a classic cherry pie, and the next, voilà! You’ve got handheld cherry goodness that can be enjoyed anywhere, anytime. They say that the way to a man’s heart is through his stomach, and with these wraps, you’ll definitely win over some hearts (and perhaps a couple of taste buds too). Want to impress your guests? These delicious little wraps will not only satisfy their sweet cravings but also ignite a conversation or two. Ready to spread some joy through your kitchen? Let’s get cooking!
Why You’ll Love This Cherry Pie Filling Wraps
There are three significant reasons why you’ll fall head over heels for Cherry Pie Filling Wraps. First, the main highlight: indulging in the delightful combination of crispy pastry and juicy cherry filling is pure bliss. Each bite is a double delight, where the crunchiness of the outside meets the smooth, pleasantly sweet filling inside.
Second, cooking these wraps at home saves you money and time! Forget overpriced desserts from the store—making your own means you can fill them with love and creativity without breaking the bank. Lastly, let’s talk toppings! Dusting your wraps with powdered sugar or drizzling them with a simple icing can elevate your dessert from ordinary to extraordinary. It’s comparable to serving a slice of classic cherry pie, but with an added twist of creativity. What are you waiting for? Your new favorite dessert is just a recipe away!
How to Make Cherry Pie Filling Wraps
Quick Overview
Let’s keep it real—Cherry Pie Filling Wraps are truly easy to whip up. They’ve got that perfect crunchy exterior and a sweet, gooey inside that will make you wonder why you didn’t try this sooner! In just 30 minutes, you can have these charming treats at your family gathering or cozy night in.
Preparation time: approximately 10 minutes
Cooking time: approximately 20 minutes
Ingredients for Cherry Pie Filling Wraps:
- 1 can cherry pie filling (about 21 ounces)
- 1 package pastry dough or spring roll wrappers (about 16 sheets)
- 1 egg (for egg wash)
- Powdered sugar (for dusting)
Make sure you have all your ingredients ready before we dive into the cooking!
Step-by-Step Instructions
- Preheat your oven: Start by preheating your oven to 375°F (190°C). This ensures your wraps will turn golden and crispy.
- Prepare your pastry: If you’re using pastry dough, roll it out to about 1/8 inch thick. If using spring roll wrappers, set them out on a clean surface.
- Fill the wraps: Spoon about 2 tablespoons of cherry pie filling onto the center of each wrap. Be careful not to overfill—keep it simple!
- Fold: For pastry dough, fold the edges over the filling and press to seal. For spring roll wrappers, pull one corner over the filling and roll it up tightly, tucking in the sides to ensure none of that delicious filling escapes.
- Egg wash: Beat the egg in a small bowl and brush the tops of the wraps lightly with the egg wash. This gives them a beautiful golden color when baked.
- Bake: Line a baking sheet with parchment paper and arrange the wraps in a single layer. Bake for 15-20 minutes, or until they are golden brown.
- Dust and serve: Once out of the oven, let them cool slightly before dusting with powdered sugar. Serve warm and enjoy!
Top Tips for Perfecting Cherry Pie Filling Wraps
- Substitutions: If you prefer, you can substitute the cherry pie filling with any halal-approved fruit filling of your choice, like blueberry or apple for a delightful twist!
- Timing: Keep an eye on your wraps while they’re in the oven; different ovens may require slight adjustments in baking time.
- Common mistakes: Ensure your wraps are well-sealed before baking to avoid any filling spills.
- Serving options: Pair these wraps with a scoop of vanilla ice cream for an indulgent dessert experience.
Storing and Reheating Tips
If you have any wraps left after your gathering (though I doubt it!), don’t fret. You can store Cherry Pie Filling Wraps in an airtight container in the refrigerator for up to 3 days. For longer storage, consider freezing them before baking; they can last up to 2 months in the freezer.
To reheat, simply pop them in the oven at 350°F (175°C) for about 10-15 minutes or until crispy and warm again. Enjoy that fresh-out-of-the-oven taste even after a few days!
Frequently Asked Questions
Can I use fresh cherries instead of canned pie filling?
Absolutely! Just be sure to pit and sweeten the fresh cherries before using them.
Can I make these wraps in advance?
Yes! You can prepare the wraps and store them in the fridge or freeze them before baking. Just add a few extra minutes to the baking time if they’re frozen.
Are Cherry Pie Filling Wraps suitable for kids?
Definitely! Kids love the sweet filling and the fun shape. They can help roll the wraps with you, too.
What can I serve with these wraps?
Pair these delicious wraps with whipped cream, ice cream, or a drizzle of chocolate sauce for added indulgence.
Now, it’s time to roll up your sleeves and create your own batch of Cherry Pie Filling Wraps! Trust me, one bite, and you’ll fall in love with their sweet charm! Happy baking!

Cherry Pie Filling Wraps
Ingredients
Method
- Preheat your oven to 375°F (190°C).
- If using pastry dough, roll it out to about 1/8 inch thick. If using spring roll wrappers, set them out on a clean surface.
- Spoon about 2 tablespoons of cherry pie filling onto the center of each wrap.
- For pastry dough, fold the edges over the filling and press to seal. For spring roll wrappers, pull one corner over the filling and roll it up tightly, tucking in the sides.
- Beat the egg in a small bowl and brush the tops of the wraps lightly with the egg wash.
- Line a baking sheet with parchment paper and arrange the wraps in a single layer.
- Bake for 15-20 minutes, or until golden brown.
- Let them cool slightly before dusting with powdered sugar. Serve warm.
Notes

I am Mark Luke and I’m the founder of PrinterBio.com. I started this site because I was tired of dealing with the problems that come with using printers. I wanted to help others avoid the time and frustration I had, So I started this site based on my own experience & what I’ve learned from other professionals. My goal is to help you find the right printer and easily solve any problems you may have with your printer.