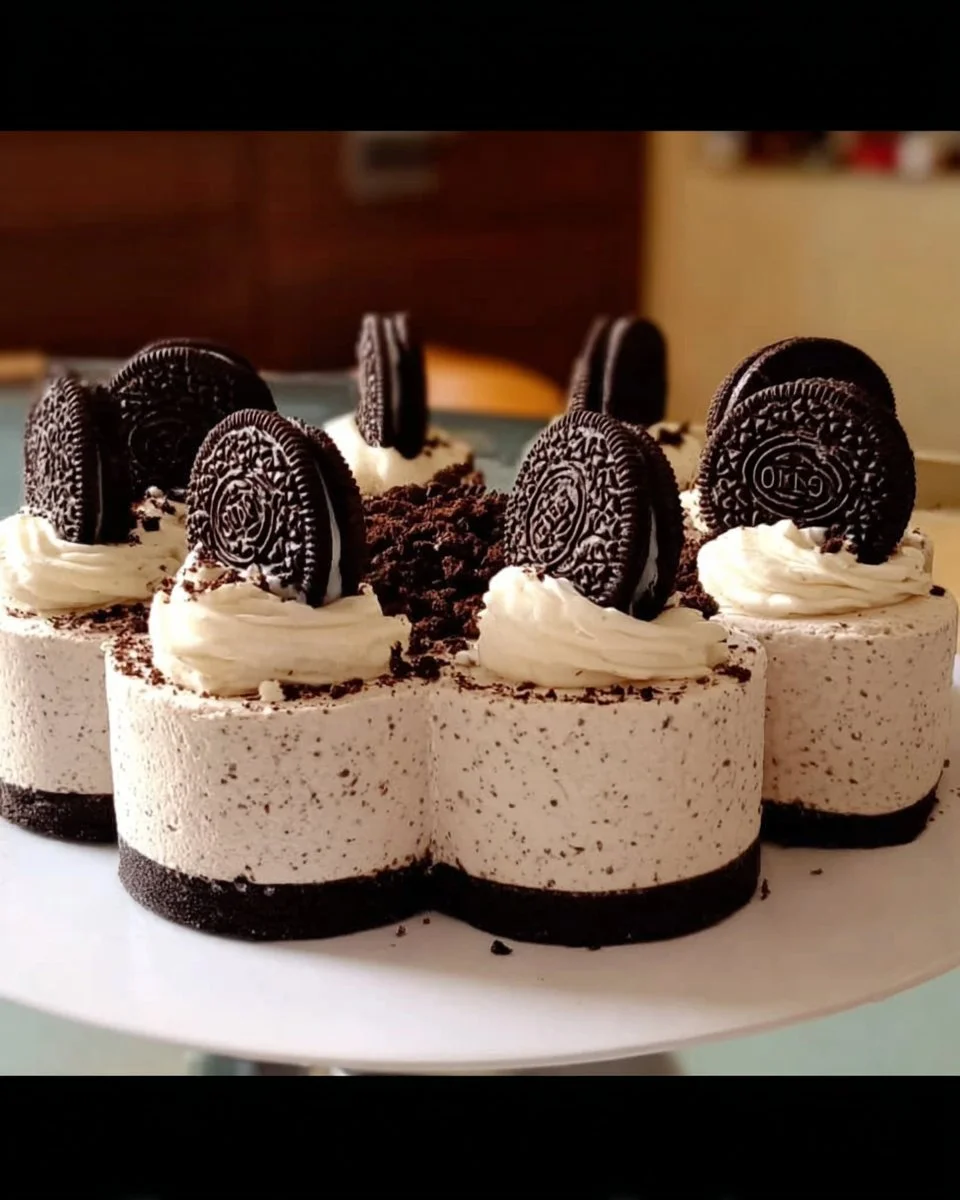
There’s something irresistible about the combination of creamy mousse and crispy Oreo cookies that makes the Oreo Mousse Cake a showstopper for any family gathering. This delectable dessert boasts a luscious texture and a rich flavor, making it a favorite for both young and old. Imagine sinking your spoon into a fluffy chocolate cream layered with crunchy cookie bits—pure bliss! I remember the first time I made it; my family couldn’t stop raving about it at our weekend dinner. This cake is not just a treat but a delightful experience. If you love easy and approachable desserts, you might find similarities with my other blog post on no-bake cheesecake, but this Oreo dessert stands out with its unique chocolatey kick! Let’s dive in and see how you can make this delightful treat in your own kitchen.
What is Oreo Mousse Cake?
So, what’s in a name? If you’re wondering what an Oreo Mousse Cake really is, let me enlighten you! It’s that dreamy concoction where crushed Oreo cookies meet a fluffy mousse, styled perfectly into a cake form. Why do we call it ‘Oreo’? Is there a hidden story behind this? No mystery here—it’s all about those beloved chocolate sandwich cookies that bring so many smiles! This light and airy dessert embraces the notion that “the way to a man’s heart is through his stomach.” And quite frankly, who can resist a slice? Trust me; once you’ve tasted this delight, you’ll be back for seconds. So grab those ingredients and let’s make some magic happen!
Why You’ll Love This Oreo Mousse Cake
You may ask, “What makes this Oreo Mousse Cake so special?” For starters, this dish is a wonderfully refreshing treat that marries robust flavors in every layer. Imagine a light, fluffy cream filling enveloped in a crunchy Oreo base that keeps your taste buds excited! Not only does making this cake save you a few bucks compared to fancy bakery desserts, but it also allows you to manage the ingredients, ensuring that they are halal and family-friendly. You could even dress it up with additional toppings like whipped cream or chocolate drizzle, making it the star of any dessert table. If you’re a fan of desserts like chocolate mousse cake, you’ll find this Oreo version just as indulgent—and possibly even more fun! Ready to impress your family? Let’s get started!
How to Make Oreo Mousse Cake
Quick Overview
Making an Oreo Mousse Cake is a breeze, perfect for both experienced bakers and new enthusiasts alike. The satisfying combination of crunchy and creamy textures beautifully blends together. With just a few ingredients and minimal prep time, you can whip this delectable dessert up in about 30 minutes (plus chilling time).
Ingredients
You’ll need the following ingredients to create your delicious Oreo Mousse Cake:
- 24 Oreo cookies
- 2 tablespoons unsalted butter, melted
- 1 cup heavy cream
- 8 oz cream cheese, softened
- 1 cup powdered sugar
- 1 teaspoon vanilla extract
- 1/2 cup crushed Oreo cookies (for topping)
Step-by-Step Instructions
- Prepare the Base: Start by preheating your oven to 350°F (if you plan to bake—this recipe doesn’t require it, but we want to be in the habit!). Crush 24 Oreo cookies in a ziplock bag until they become fine crumbs. In a bowl, mix the crushed cookies with 2 tablespoons of melted butter. You want the mixture to feel like wet sand.
- Form the Crust: Press the Oreo mixture evenly into the bottom of a springform pan. Make sure it’s firmly packed to hold its shape. Set aside.
- Create the Mousse: In a large mixing bowl, beat 8 oz of softened cream cheese until smooth. Gradually add the 1 cup of powdered sugar and continue to mix until combined. Next, add the vanilla extract.
- Whip the Cream: In another bowl, whip 1 cup of heavy cream until stiff peaks form. This may take about 3-5 minutes, but make sure you keep an eye on it—you don’t want butter!
- Combine: Gently fold the whipped cream into the cream cheese mixture. You want to preserve that airy texture, so don’t just dump it all in at once.
- Layer and Chill: Pour the mousse over the prepared Oreo crust, smoothing the top with a spatula. Sprinkle the remaining crushed Oreo cookies on top. Cover and refrigerate the cake for at least 4-6 hours, or overnight if you can’t resist that long!
- Serve: Carefully remove the springform pan, slice, and serve. Enjoy every delicious bite!
Top Tips for Perfecting Oreo Mousse Cake
- Substitutions: If you want a slightly healthier twist, consider using low-fat cream cheese or a dairy-free alternative. Just ensure these options are halal-compliant.
- Timing: Giving your mousse cake plenty of time to set in the refrigerator is essential for achieving that impressive slicing effect.
- Avoid Common Mistakes: Be cautious when folding the whipped cream into the cream cheese mixture; do it gently to keep that light, airy texture.
Storing and Reheating Tips
Your Oreo Mousse Cake can be a delightful treat for a few days! Store any leftover cake in the refrigerator, covered with plastic wrap or in an airtight container, where it will last up to 5 days. For longer storage, consider freezing it. Wrap the whole cake tightly in plastic wrap, then in aluminum foil. You can freeze it for up to 2 months. When you’re ready to enjoy it again, let it thaw in the refrigerator overnight to maintain that creamy texture. Remember, this treat’s best enjoyed chilled!
Conclusion
We’ve put together a whimsical and indulgent Oreo Mousse Cake that your family will adore. With its perfectly balanced textures and uncomplicated preparation, it’s a perfect addition to any gathering. Whether you’re celebrating a special occasion, hosting a casual get-together, or simply indulging on a cozy winter evening, this cake brings joy to the table. I guarantee you’ll enjoy every bite you take. So, what are you waiting for? Roll up your sleeves and get started on creating this delightful dessert today!
This post is dedicated to delivering an easy and indulgent experience while ensuring every ingredient adheres to halal compliance, making it suitable for a loving family environment. Happy baking!

Oreo Mousse Cake
Ingredients
Method
- Preheat your oven to 350°F (note: the cake does not require baking, but this is good practice).
- Crush 24 Oreo cookies in a ziplock bag until they become fine crumbs.
- In a bowl, mix the crushed cookies with 2 tablespoons of melted butter until the mixture feels like wet sand.
- Press the Oreo mixture evenly into the bottom of a springform pan and set aside.
- In a large mixing bowl, beat 8 oz of softened cream cheese until smooth.
- Gradually add 1 cup of powdered sugar and mix until combined.
- Add 1 teaspoon of vanilla extract to the mixture.
- In another bowl, whip 1 cup of heavy cream until stiff peaks form.
- Gently fold the whipped cream into the cream cheese mixture to preserve the airy texture.
- Pour the mousse over the prepared Oreo crust, smoothing the top with a spatula.
- Sprinkle the remaining crushed Oreo cookies on top.
- Cover and refrigerate the cake for at least 4-6 hours, or overnight for best results.
- Carefully remove the springform pan, slice, and serve. Enjoy every delicious bite!
Notes

I am Mark Luke and I’m the founder of PrinterBio.com. I started this site because I was tired of dealing with the problems that come with using printers. I wanted to help others avoid the time and frustration I had, So I started this site based on my own experience & what I’ve learned from other professionals. My goal is to help you find the right printer and easily solve any problems you may have with your printer.